
Right now, your portfolio opens at an address like firstname.github.io. That works, but a personal address like firstname.com looks more professional and is easier to remember. This guide shows you how to connect a custom domain name to your GitHub Pages site. You do not need to know any technical words. I will explain each one before we use it. The setup takes about 20 minutes, and then you wait for the internet to catch up, which can take some hours.
If you have not built your site yet, start with my guide on how to create a free portfolio website on GitHub Pages.
Your job is simple. You will tell GitHub your domain name, then tell the address book (DNS) to send visitors to GitHub.
What you need before you start
- Your GitHub Pages site, already live at
whatevername.github.io - A way to pay for a domain name
- About 20 minutes, plus waiting time
Key Takeways:
- DNS is the internet’s phonebook. It turns a name like yourname.com into the number (IP address) of the server that holds your site.
- Three different jobs are often mixed up: the registrar (where you buy the domain), the DNS host (where your records live) and the web host (where your site files live). One company can do all three, or three companies can.
- Edit records only at your DNS host. The DNS host is the company named in your domain’s name servers.
- You need to know six records: A, AAAA, CNAME, MX, TXT and NS. Plus one setting, TTL.
- A domain transfer moves the registration, not the website. Unlock the domain, get the transfer code, and keep your DNS safe first.
- To move hosting without downtime, set up the new host first, lower the TTL a day early, then switch the record.
Step 1: Purchase a Domain Name from a Reliable Registrar
Choosing the name
A domain name is your website’s address through which people will access your website online. For example, if your name is Abcd Efgh, you could register abcdefg.com for your portfolio website.
- Keep it short and easy to spell. Say it out loud to a friend. If they ask “how do you spell that?”, try a simpler one.
- A
.comis the most familiar. Other endings can work too. - Avoid hyphens and numbers if you can.
for example:
- tyrian.com
- alexlannister.me
- tyrianlannisterportfolio.com
After choosing a domain name, you need a domain registrar. You can go with anyone. I will do it from Namecheap for this tutorial.
Keep these points in mind when choosing:
- Prefer your own name if it’s available.
- Consider .com first, or alternatives such as .me.
- Avoid unnecessary numbers and hyphens.
- Keep two or three alternatives ready.
Step 1a: Visit Namecheap
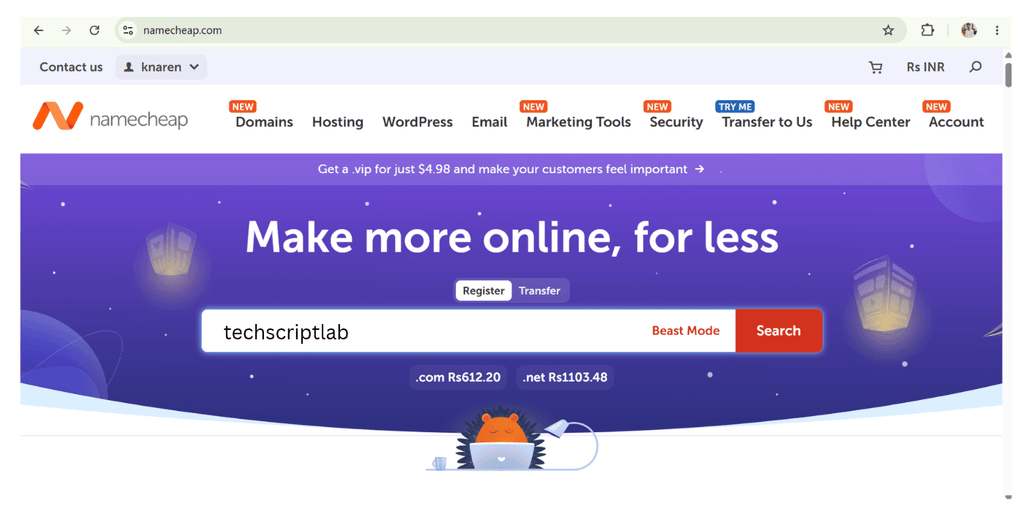
Open your browser and visit the official website: www.namecheap.com.
You’ll find a domain search box on the homepage. This is where you’ll check whether your preferred domain is available.
Step 1b: Search for Your Domain Name
Enter your preferred domain name in the search box. For example, let’s use techscriptlab.
You will see a list of domain names including, .com, .in, .org, .ai, .store and many more. Generally .com is recommended globally for its professionalism, but I will suggest you go with the cheaper one for your portfolio website. Companies are going to see what you can do for them not just finalize you seeing professionalism in your domain name. Pick the cheaper one, you will thank me later.
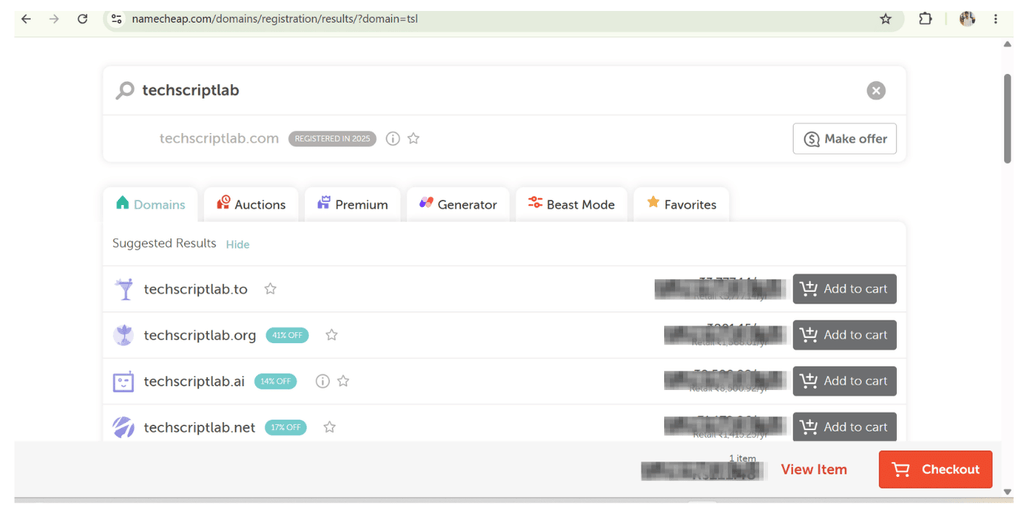
You’ll generally encounter three possibilities:
- Available: You can register the domain by adding it to your cart.
- Taken: Someone else has already registered it. Try another name or extension.
- Premium: The domain may have a significantly higher price. Check the cost carefully before purchasing.
Step 1c: Add Your Domain to the Cart
Once you find an available domain, click Add to Cart and click on Checkout
Namecheap may suggest additional services, including web hosting, SSL certificates, professional email and WordPress hosting.
You don’t need to purchase these services to register your domain. You can skip them and buy hosting separately later.
Open your shopping cart and proceed to checkout.
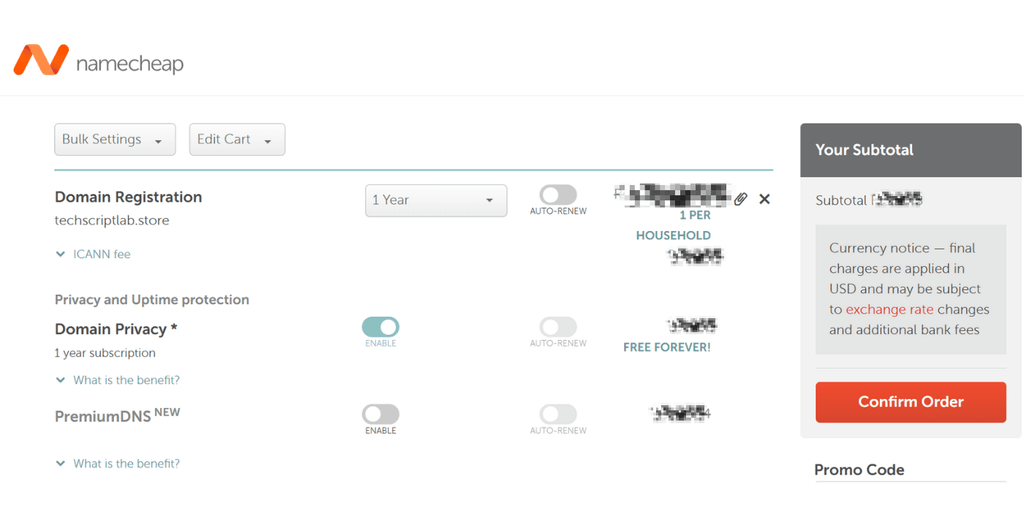
Step 1d: Review Your Registration Settings
Before proceeding, check these options:
- Registration Period: Choose your registration duration. One year is a reasonable starting point. Remember to renew before expiration.
- Domain Privacy: Enable free privacy protection (if available) to keep your personal contact information private.
- Auto-Renewal: Enable this option if you want Namecheap to automatically attempt renewal before expiration.
- Additional Services: Remove any unnecessary add-ons you don’t need.
Step 1e: Enter Payment Details and Complete Your Purchase
Select an available payment method and provide the required billing information.
Namecheap supports payment options such as credit/debit cards and PayPal, depending on your location and account.
Before proceeding, check your domain name, registration period, additional services and final price, including applicable taxes.
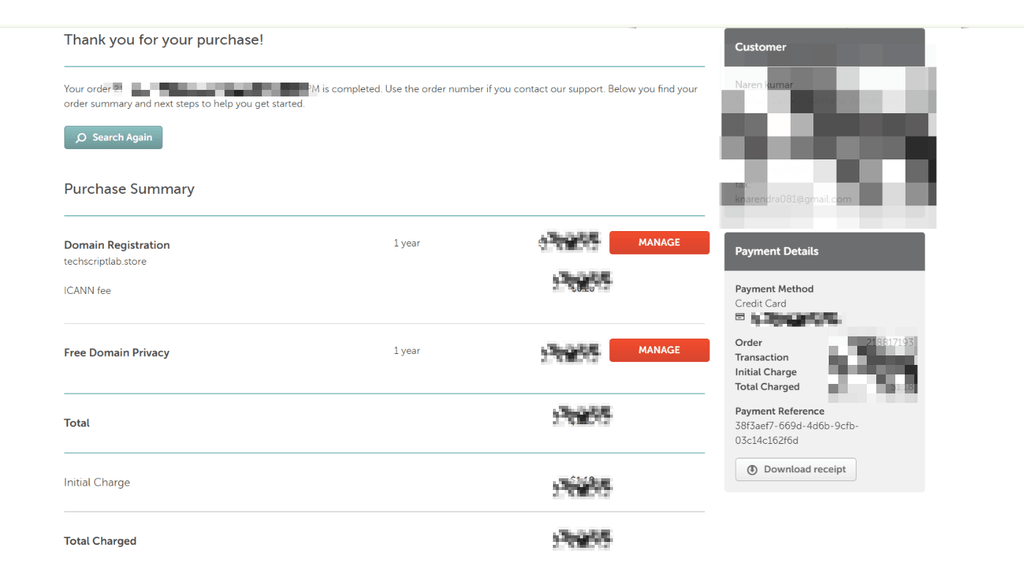
Review your order and click Pay Now if everything is correct. Once the payment is successful, you’ll receive an order confirmation on Namecheap and a confirmation email. Congratulations! You’ve registered your first domain name.
Final Step: Verify Your Email Address
Check your registered email address for any domain verification request from Namecheap.
If you receive one, open the email and click the verification link to complete the process.
Don’t ignore verification requests, as failure to complete required verification can result in domain suspension.
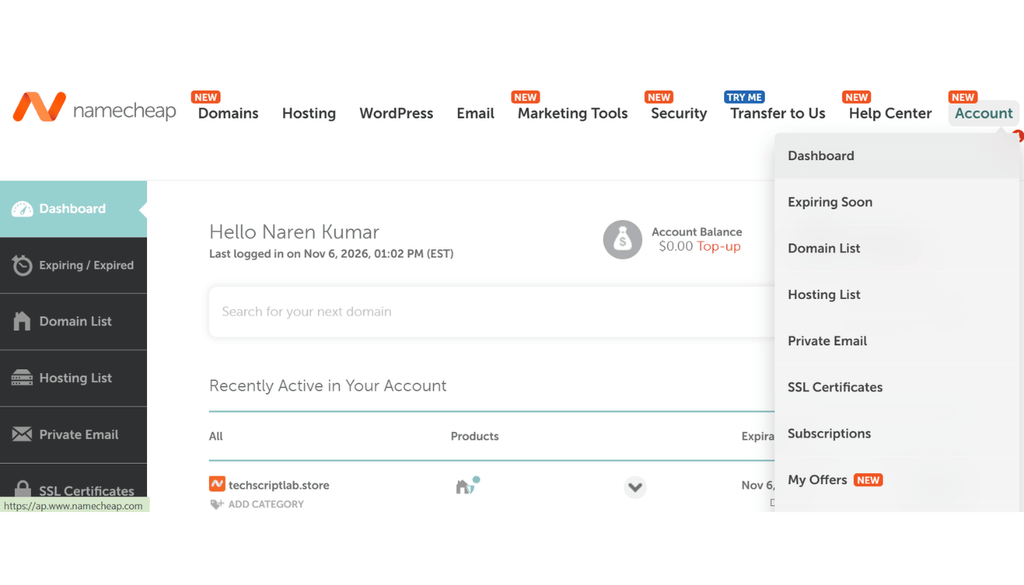
Managing Your Purchased Domain
To find your domain later:
- Sign in to your Namecheap account.
- Open Domain List from your dashboard.
- Find your purchased domain.
- Click Manage.
From here, you can check its expiration date, manage privacy, change nameservers, configure DNS records and adjust auto-renewal settings. Scroll around the domain list section to get familiar with it, we will visit this section few more times.
Step 2: Tell GitHub your domain first
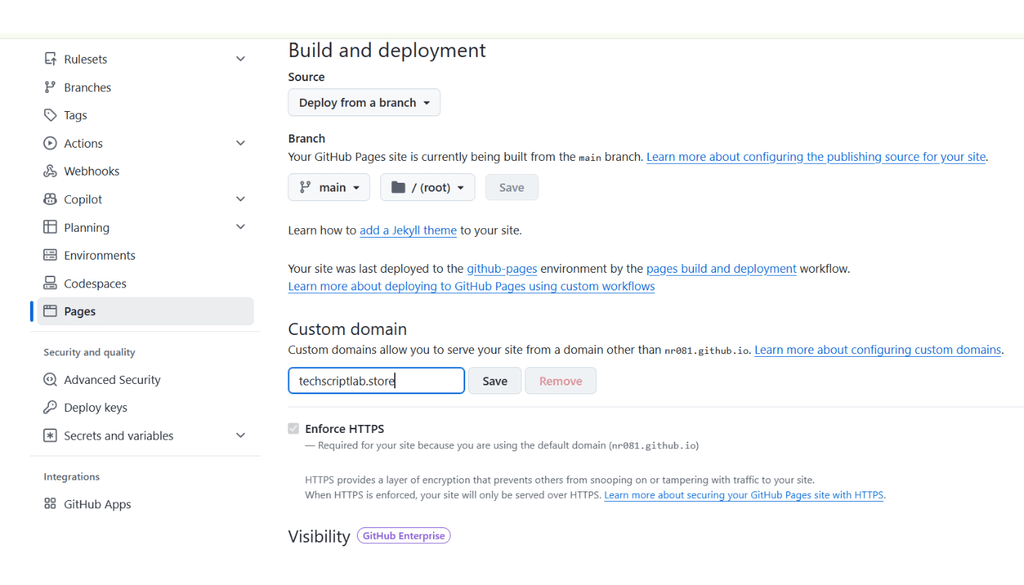
GitHub’s own guide says to add your domain on GitHub before you connect a custom domain to GitHub pages site or change any DNS records. This stops other people from using your domain on their own GitHub sites.
- Open the menu at the top left corner. Click on the all repositories from the list. Open your GitHub repository.
- On the repository page, you will see top menu. Click Settings.
- In the left sidebar, under Code and automation, click Pages.
- Under Custom domain, type your domain, for example
techscriptlab.storeand click Save.
GitHub will add a small file called CNAME to your repository. This is the part of the process. Ignore it but do not delete it.
Step 3: Add the DNS records to connect a custom domain to GitHub pages site
Now tell the internet’s address book where your site lives.
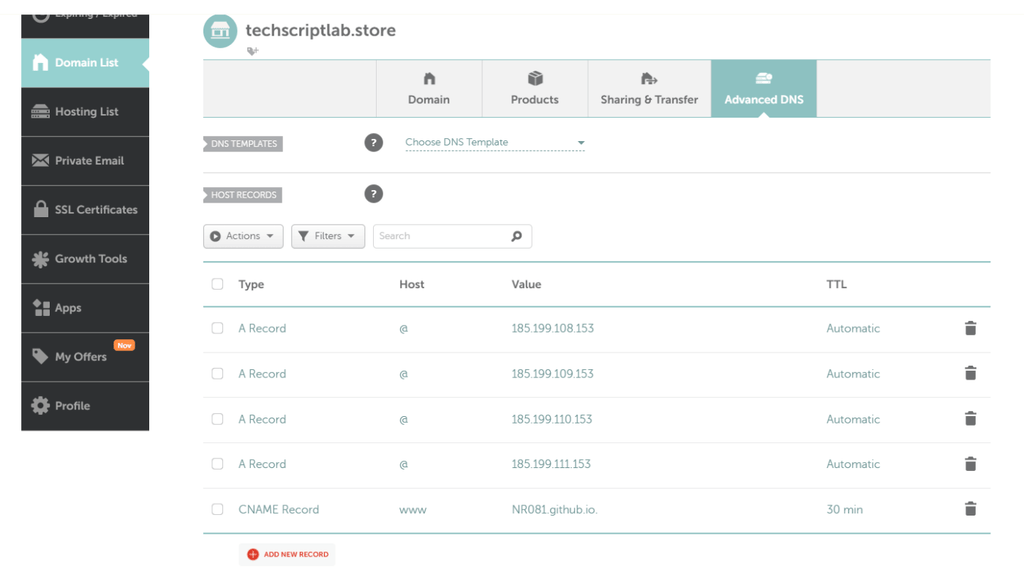
- Log in to your domain registrar, the place you purchased your domain from (Namecheap in our case).
- Go to dashboard, and click on the domain list.
- Go to the Advanced DNS section.
- Delete the default records the registrar added for parking or ads. Leave email records alone if you use email with this domain.
- Add the records in the table below. Copy them exactly.
| Type | Host (Name) | Value |
| A | @ | 185.199.108.153 |
| A | @ | 185.199.109.153 |
| A | @ | 185.199.110.153 |
| A | @ | 185.199.111.153 |
| CNAME | www | ********.github.io |
The @ sign means “the plain domain”, like yourname.com. For the CNAME value, write only your GitHub username followed by .github.io. Do not add the repository name.
These addresses come from GitHub’s own guide. They can change, so check them against GitHub’s current custom domain guide before you copy.
The four A records are the same for everyone, so copy them exactly. In the CNAME row, replace username with your own GitHub username.
Step 4: Wait, then check it works
DNS changes can take up to 24 hours to spread across the internet. Often it is much faster. If your page does not open yet, wait a few hours and try in a private window.
Step 5: Turn on HTTPS
HTTPS is the little padlock in the browser. It means the connection to your site is private.
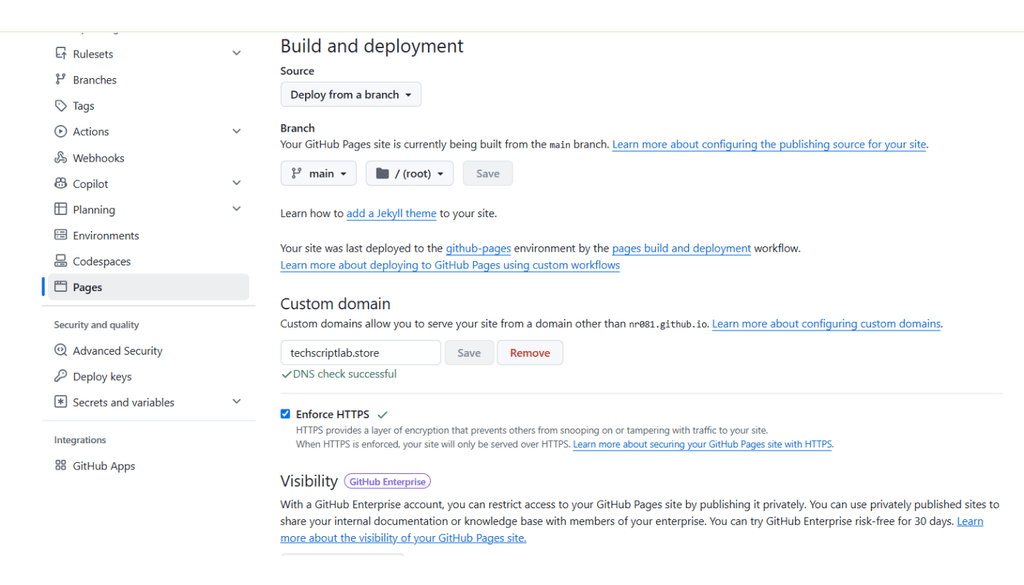
- Go back to Settings, then Pages in your repository.
- When a green check mark appears beside your domain, tick Enforce HTTPS.
- If the box is greyed out, wait. GitHub says the certificate can take some time. If it does not appear after a while, remove the domain, type it again, and save.
Step 6: Verify your domain (recommended)
GitHub advises you to verify your domain so nobody else can use it for their own GitHub site. Click on your profile picture at the top right corner got to account Settings then go to Pages from the list on the left side.
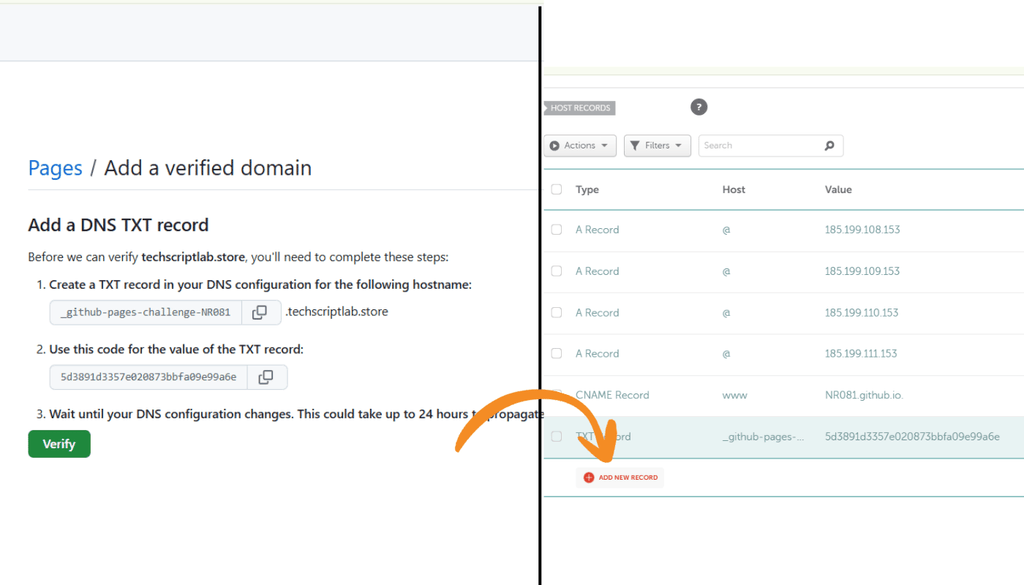
GitHub gives you a short text record to add in your DNS, just like Step 3.
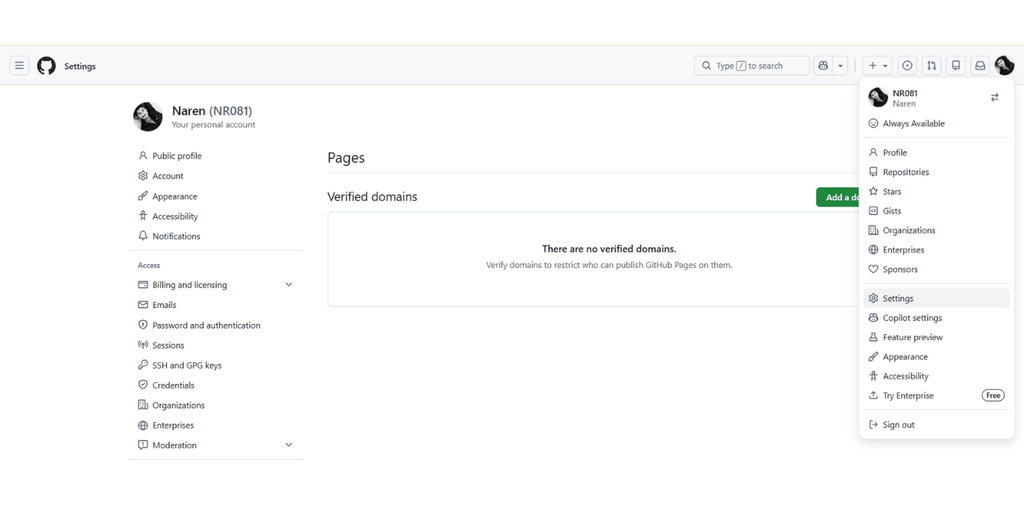
Check on your screen the exact menu names and the record GitHub shows you. Match them before publishing.
Add your domain name to verify. GitHub will give you txt records including host and value, copy them and paste into your registrar’s DNS. You can visit step 3 to add records.
Click on verify. It may take upto 24 hours.
If it does not work
| Problem | What to do |
| Your domain shows an error or a parked page | The old registrar records may still be there. Delete them and keep only the five from Step 3. |
| Nothing changes after a few hours | Wait up to 24 hours. Then check the records for typos. |
| The Enforce HTTPS box is missing or grey | Wait, then remove the domain on GitHub and add it again. Extra wrong DNS records can also block it. |
www works but the plain domain does not, or the other way around | Check both the four A records and the CNAME record. |
| You get a different site | Make sure the domain is added in your repository’s Pages settings and the CNAME file is still there. |
Frequently Asked Questions
Do I need to buy a domain to use GitHub Pages?
No. Your site works for free at yourusername.github.io. A domain is optional, but it looks more professional.
How long does a custom domain take to work?
GitHub says DNS changes can take up to 24 hours. Many are faster.
Can I use both the plain domain and www?
Yes. Add the A records for the plain domain and the CNAME for www. GitHub redirects between them.
If you want a full business website with strong hosting and a blog, see my AWS and web consulting service, or get in touch.

About the author
Hi, I’m Naren Suryananda. I’m a technical content writer with three years of experience and an AWS Certified Solutions Architect – Associate certification. I’ve written for both technical and non-technical audiences. Simplifying complex ideas is what brought out the writer in me—and it’s still what I enjoy most. That’s why I started Tech Script Lab, where I help SaaS and IT companies, startups, and agencies create value-driven content.
Need website for your business?
Tell me about your project and I will reply with a clear plan and a quote.